[Update 3]: No need for manual Android 2.2 updates anymore. Official Android 2.2 has arrived and will be installed over-the-air in the next few days. Of course, you can install it manually too. [/Update 3]
[Update 2]: Another Android 2.2 update is now available: FRF83. It can be installed if you are running either FRF50 or FRF72. You can use the procedure below to update to FRF50 and then update to FRF83. Or you can wait for the official OTA update. [/Update 2]
[Update]: This post describes an update process from the official Android 2.1 ERE27 build to the unofficial Android 2.2 FRF50 test build. More recent Android 2.2 FRF72 test build is now available. To install FRF72, first you need to have FRF50 installed by following the instructions below. Then you can upgrade to FRF72. [/Update]
If you are one of the lucky owners of the Nexus One phone, you can now manually update your phone to a test version of Android 2.2. Pay attention to the word test, as the currently available update may be replaced with another final 2.2 build in the next few weeks. Installation will only take 10-20 minutes and will deliver all the great Android 2.2 features to your Nexus One. The update process seems to work relatively straight forward for most users.
TechCrunch first reported that some bloggers have started receiving an OTA update on March 22nd. This has been confirmed by Google’s official AndroidDev twitter on March 24th:
Android 2.2 is being rolled out to a very limited test group. We expect a final build to be available for OTA updates shortly, stay tuned!
Disclaimer
The FRF50 build described in this post is the not the final Android 2.2 build (final version will be pushed to Nexus One owners over-the-air in the coming weeks). If you do not feel comfortable performing this update on your own, wait for an official Nexus One OTA update from T-Mobile.
Pre-requisites
- Non-rooted Nexus One phone. If you are not sure whether your phone is rooted, it is probably not.
- Before you start an update process, your current build number should be ERE27 (find it under Settings -> About phone -> (scroll down) -> Build Number).
Manual Android 2.2 Installation
While this installation procedure may look like a long one to go through, it should not take more than 10-20 minutes to complete. The procedure looks more complicated than it actually is because of the detailed description and screenshots of each step.
Note: If you’re running anything else than stock Nexus One, do not follow the procedure below and see FAQ instead.
- Fully charge your phone since you don’t want your phone dying in the middle of an update process.
- Download to your computer zip archive of the 2.2 update using the following link. The name of the zip archive is signed-passion-FRF50-from-ERE27.1e519a24.zip.
- Rename downloaded file to update.zip.
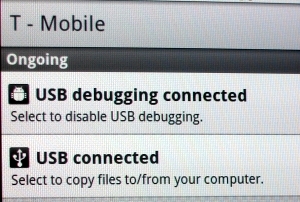
- Connect Nexus One via USB cable and touch Select to copy files to/from your computer on the phone to connect it as a removable drive to your computer.
- Copy the update.zip file to the phone’s microSD card.
- Turn the phone off.
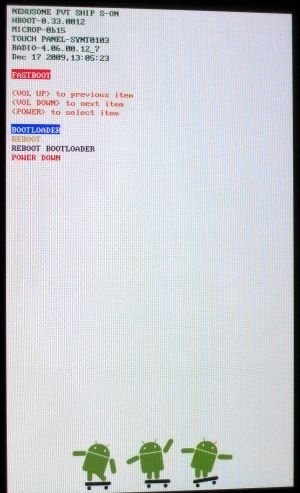
- Simultaneously press and hold down the Power button and the trackball to turn on the phone. Hold down both buttons until you see a FASTBOOT screen with the white background and 3 android robots at the bottom.
- If you see the standard Nexus One logo, it means you pressed only the Power button and the phone is booting in the normal mode. In this case, wait until the boot up is complete and turn off the phone. Repeat step 7.
- Bootloader line should be highlighted in blue. Press the Power button to continue.
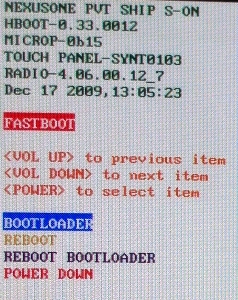
- When the next screen (HBOOT) loads, click once on the Volume Down button to highlight Recovery.
- Once Recovery is highlighted, press the Power button to proceed.
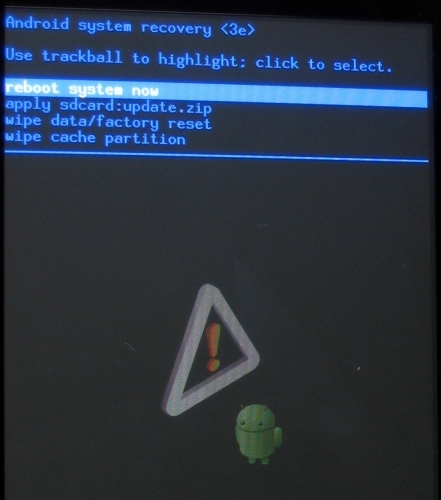
- The phone will reboot and you will see Nexus One logo, followed by an Android picture with an exclamation point in a triangle (don’t worry, it’s a part of the normal update process).
- Press simultaneously the Power and the Volume Up buttons (this may take a few tries).
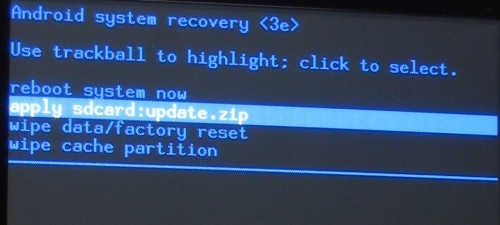
- Android system recovery screen will appear.
- Use the trackball (or the Volume Down button) to highlight apply sdcard:update.zip and press on the trackball to proceed.
- Note: be very careful when pressing down on the trackball. You don’t want your movement to be interpreted as a Scroll Down followed by an Enter, because the next item in the menu is wipe data/factory reset. If you accidentally perform a wipe, you will not “brick” your phone, but you will have to re-install all your apps after this update is completed.
- Sit back and relax. Update process will complete on its own.
- The phone screen will change in the following order:
- Progress bar fills to 100%.
- Unpacking box will appear for about a minute.
- Phone will automatically reboot.
- Nexus One logo will appear.
- Nexus One boot up video will start playing.
- Android 2.2 will load.
- You’re done. Enjoy!
FAQ
- Q: Will this update leave my applications, data, bookmarks and shortcuts intact?
- A: Yes. But make a habit of backing up before applying any major updates (and this is a major update).
- Q: I have a rooted Nexus One phone. What can I do?
- A: Follow instructions from Android Community.
- Q: I have another Android phone (not Nexus One). What can I do?
- A: Wait until your phone gets an update from your carrier. I will update this post if any preliminary updates will become available for other phones.
Related posts




 Twitter
 RSS
RSS
12 Comments
good share, great article, very usefull for us…thanks!
So, this is well typed up but I get an error when verifying my system after the update begins……
a long code and then (status 7) it aborts and I just have to reboot. That’s it.
I do have some no image file type errors when I hit the bootloader screen…. wonder if that’s related.
ERE27 rooted but stock rom.
@Greg. This procedure is for non-rooted phones.
Could you elaborate on the error message you are getting? What is your carrier?
I jut did this many times. re-doing it. It just says E: Signature verification failed. Installation Aborted……
What am I doing wrong??
@Graham
What’s your current build? Which link did you use to download the update file? What’s your carrier?
I have a Mac. I downloaded the file and compressed it to zip. Then I dragged it to my SD card. And unplugged everything and then turned my nexus one off and followed all of your instructions. I have no idea what I did wrong.
I Have ere27. I am not rooted. I used the ere27 to frf50 link. And I’m on T-Mobile.
What do you mean by “compressed it to zip”? The download link should give you compressed zip file. If for some reason Mac forces you to unzip and then zip the files, try downloading again, but this time saving the file directly to the phone (mount it as an external drive first). Then rename it (on the phone) to update.zip and repeat the procedure from there on.
I tried like you said and it just said, “No such file or directory” when it tries to unpack the update.
Are you getting this error at step 14? Double check that you renamed the downloaded file to the update.zip. It should be lowercase and located in the top directory of the sd card. And make sure it’s update.zip, not update.zip.zip or anything like that.
I wait for the legal version and its comes now very fast!!!
Nice Information.. Thx for sharing this.
8 Trackbacks
[...] bongizmo.com Android to the Masses Skip to content HOMEANDROIDABOUT « Salivating over FroYo How to manually update Nexus One with Android 2.2 FroYo (with screenshots) » [...]
[...] if you have a phone running Android 2.2 FroYo (at the moment, this means Nexus One with the manually installed pre-release of Android 2.2). Google Chrome to Phone Extension allows sending links from your Chrome [...]
[...] test build of Android 2.2. If you currently don’t have FRF50 build installed, follow these instructions to install FRF50 first and then you can update to FRF72. I will later report any observable [...]
[...] How to manually update Nexus One with Android 2.2 FroYo (ERE27 to FRF50) [...]
[...] How to manually update Nexus One with Android 2.2 FroYo (with screenshots) [...]
[...] ERD79 -> EPF21B images / zip / online kitchen (optional root / insecure / himem) - Modaco How to manually update Nexus One with Android 2.2 FroYo (ERE27 to FRF50) - Bongizmo.com The comprehensive list of update.zip links - Google Support Forum Tags: android, back to [...]
[...] http://www.bongizmo.com/blog/how-to-manually-update-nexus-one-with-android-2-2-froyo-with-screenshot… [...]
[...] If you don’t have root, follow these manual steps (if you are new to the update process, check out this slightly outdated, but detailed update guide). [...]